280 lines
11 KiB
Markdown
280 lines
11 KiB
Markdown
# expressCart
|
|
|
|
## Installation
|
|
|
|
1. Create a folder to hold your installation: `mkdir expressCart`
|
|
2. FTP/Copy the contents of the zip to your newly created folder
|
|
3. Enter folder: `cd expressCart`
|
|
4. Install dependencies: `npm install`
|
|
5. Start application: `npm start --production`
|
|
6. Visit [http://127.0.0.1:1111](http://127.0.0.1:1111) in your browser
|
|
|
|
Keeping expressCart running after closing the terminal can be done in a few ways but we recommend using the `PM2` package. To set this up:
|
|
|
|
1. Install PM2: `npm install pm2 -g`
|
|
2. Add expressCart to PM2: `NODE_ENV=production pm2 start app.js --name "expressCart"`
|
|
3. Check PM2 has our app: `pm2 list`
|
|
4. Save the PM2 config: `pm2 save`
|
|
5. To start/stop: `pm2 start expressCart` / `pm2 stop expressCart`
|
|
|
|
> Note: Node.js version 7.x or greater is needed.
|
|
|
|
### Docker
|
|
|
|
The easiest way to get up and running is using Docker. Once the Docker CLI is installed from [https://www.docker.com/get-docker](https://www.docker.com/get-docker).
|
|
|
|
1. Enter the root of the expressCart application
|
|
2. Change `/config/settings.json` - `"databaseConnectionString": "mongodb://mongodb:27017/expresscart"`
|
|
3. Run: `docker-compose up --build`
|
|
4. Visit [http://127.0.0.1:1111](http://127.0.0.1:1111) in your browser
|
|
|
|
### Deploy on Heroku
|
|
|
|
[](https://heroku.com/deploy?template=https://github.com/mrvautin/expressCart)
|
|
|
|
> Note: When deploying to Heroku you will need to configure your external MongoDB either on your own server or a hosted service on mLab, AWS etc.
|
|
|
|
## Admin
|
|
|
|
Visit: [http://127.0.0.1:1111/admin](http://127.0.0.1:1111/admin)
|
|
|
|
A new user form will be shown where a user can be created.
|
|
|
|
### Styling
|
|
|
|
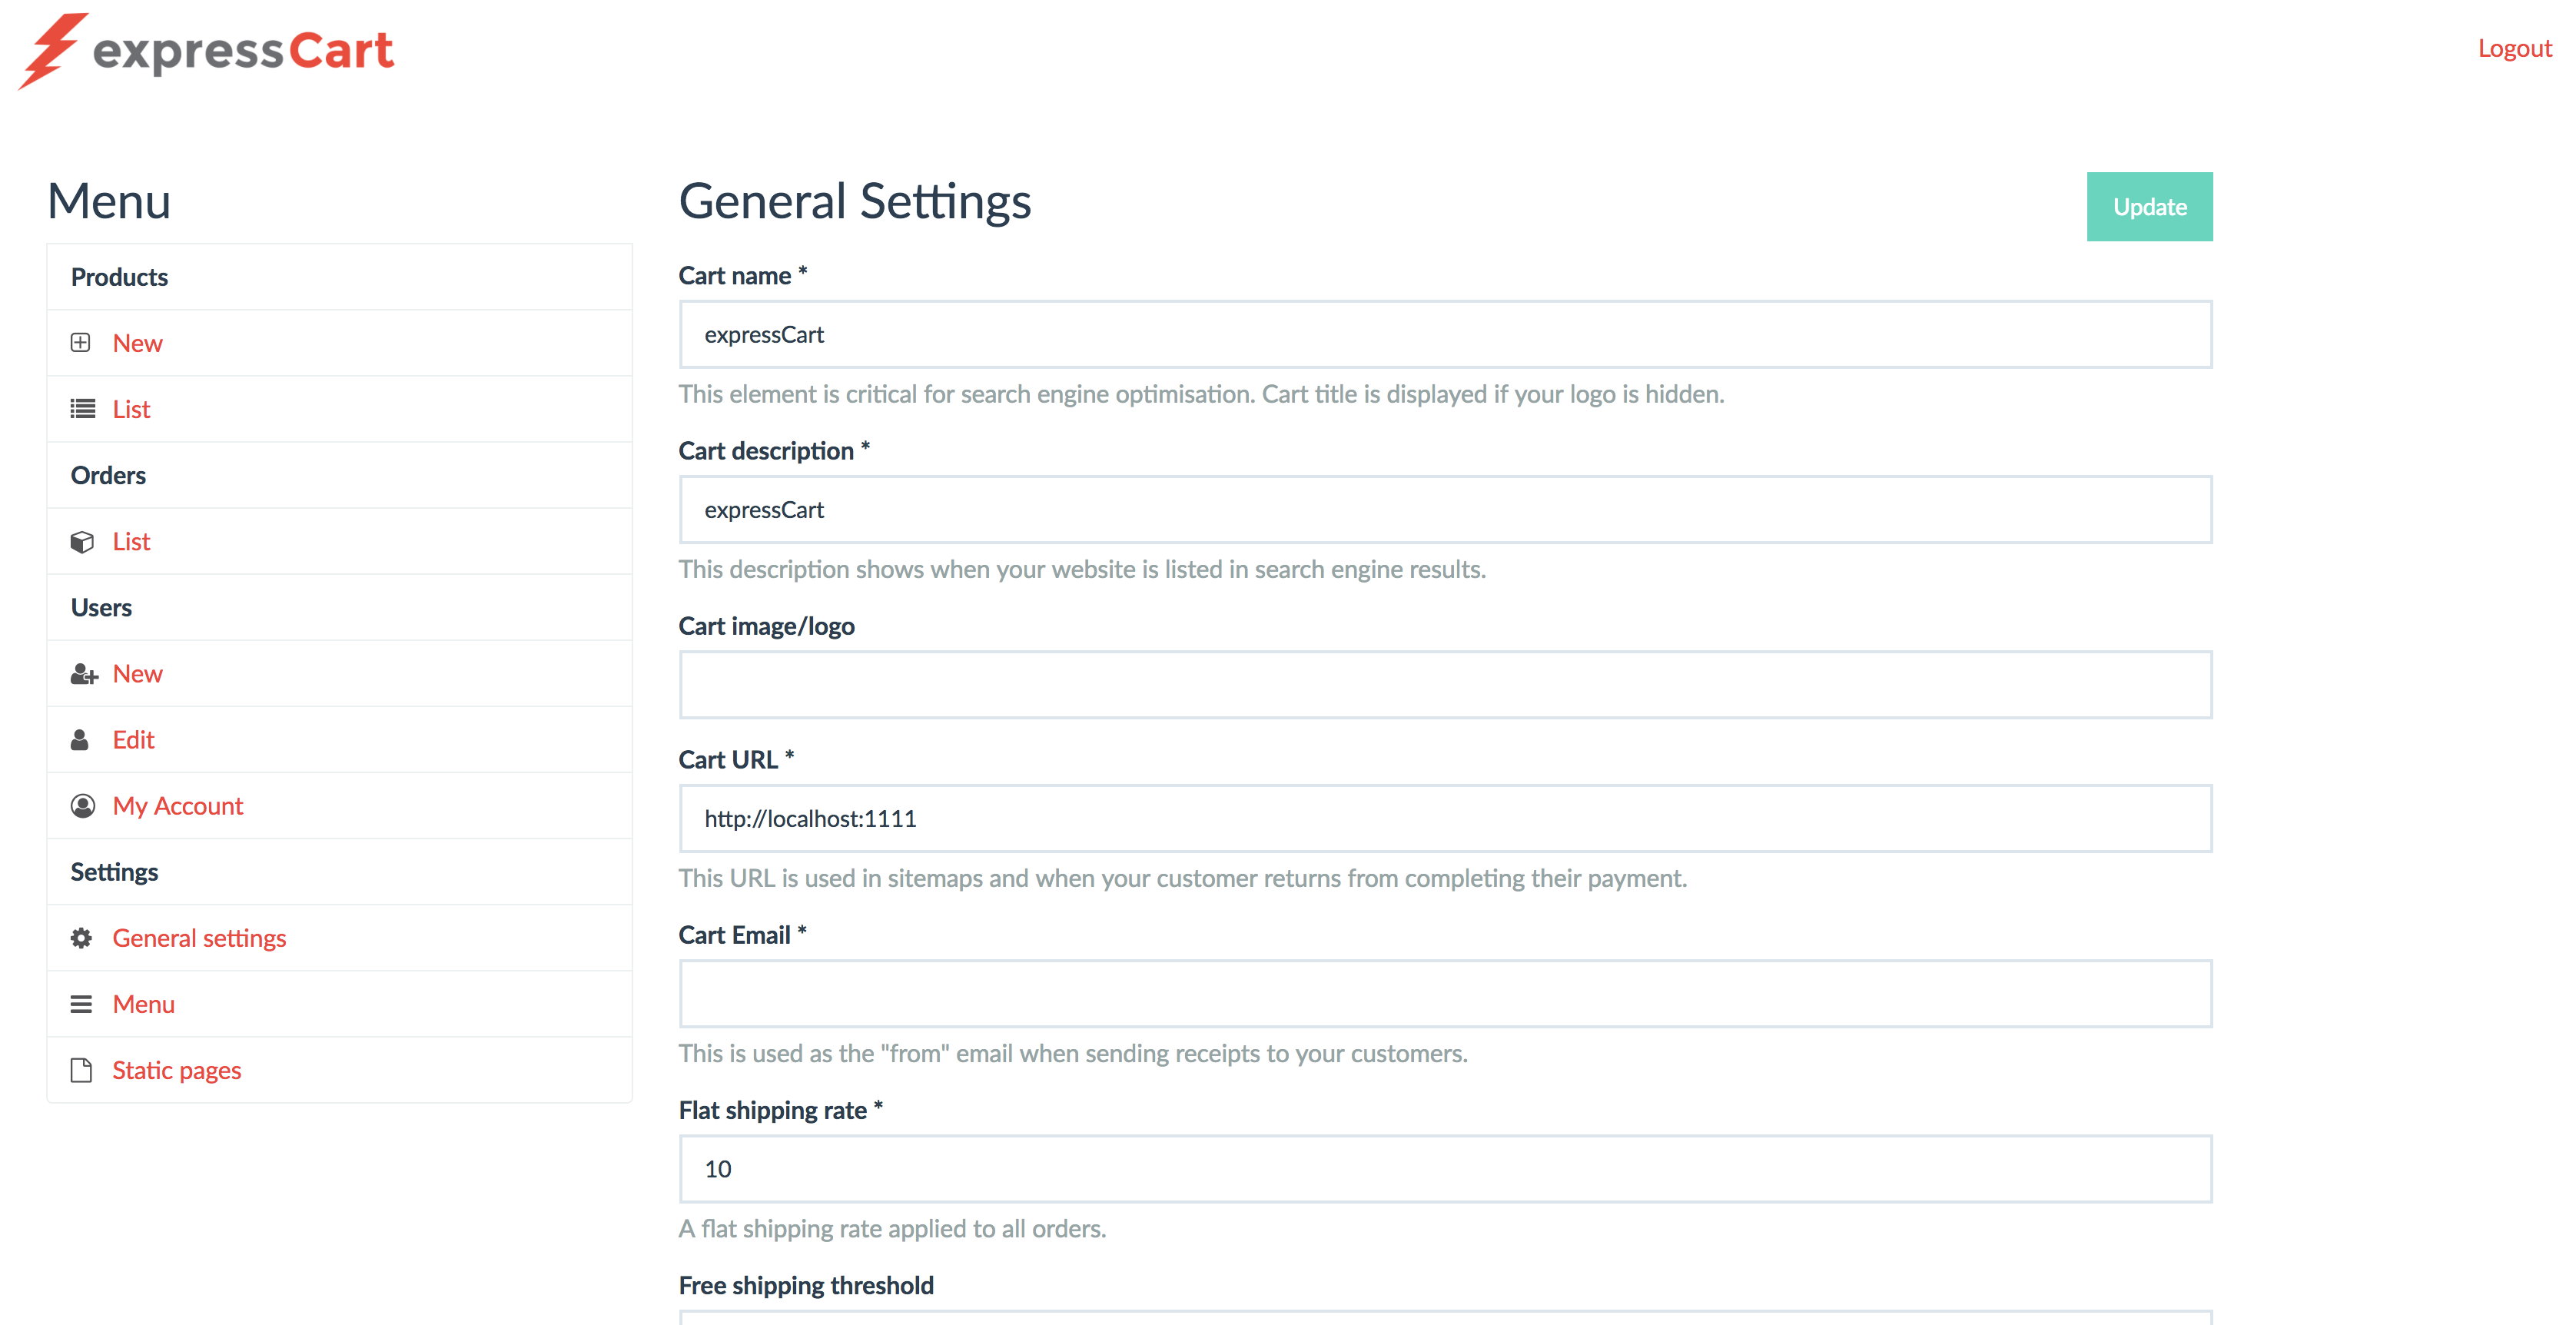
Adding your own custom style is done by accessing the `Admin` panel then selecting `General settings`.
|
|
|
|
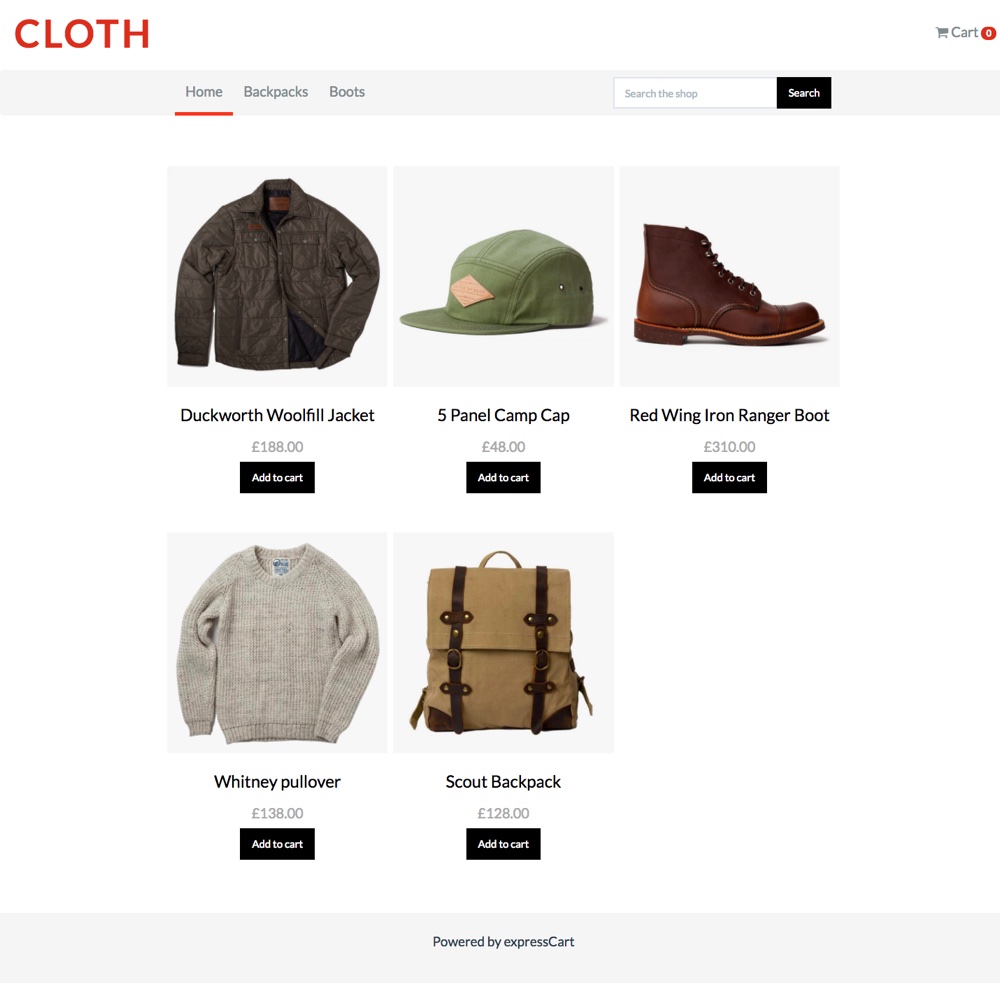
#### Demo images
|
|
|
|
Sample homepage
|
|
|
|
|
|
Admin page
|
|
|
|
|
|
##### CSS
|
|
|
|
You can add your own custom CSS into the `Custom CSS` box. This will be minified and added to each page.
|
|
|
|
##### Footer
|
|
|
|
You can add your own custom HTML footer which may have contact details, social media links etc into the `Footer HTML` box. This will be added to bottom of each page.
|
|
|
|
### Products
|
|
|
|
Adding of new products is done via `/admin/product/new`.
|
|
|
|
##### Product price
|
|
|
|
Set this value to a full 2 decimal value with no commas or currency symbols.
|
|
|
|
##### Permalink
|
|
|
|
A permalink is a nice link to your product which is normally shown in search engine rankings. By default, a no Permalink value is set when adding a product one will be generated using the Product title with spaces replaced by dashes.
|
|
|
|
##### Options
|
|
|
|
You may want to set product options such as `Size`, `Color` etc.
|
|
|
|
Below is an explanation of the fields and what they do
|
|
|
|
`Name` = Something easy to recognize to administer
|
|
`Label` = This will be shown to the customer (eg: `Select size`, `Select color` etc)
|
|
`Type` = You can set the option to a `Select` (drop down menu), `Radio` (An optional button) or a `Checkbox` for an on/off or true/false option
|
|
`Options` = Available options are added using a comma separated list. For size options you may set: `Small,Medium,Large` or `S,M,L`
|
|
|
|
Note: An `Options` value is not required when `Type` is set to `Checkbox`.
|
|
|
|
##### Product tag words
|
|
|
|
Tags are used when indexing the products for search. It's advised to set tags (keywords) so that customers can easily find the products they are searching for.
|
|
|
|
## Database
|
|
|
|
`expressCart` uses a MongoDB for storing all the data. Setting of the database connection string is done through the `/config/settings.json` file. There are two properties relating to the database connection:
|
|
|
|
Example MongoDB configuration:
|
|
|
|
```
|
|
{
|
|
"databaseConnectionString": "mongodb://localhost:27017/expresscart"
|
|
}
|
|
```
|
|
|
|
Note: The `databaseConnectionString` property requires a full connection string. You may need to add authentication parameters to your connection string.
|
|
|
|
> For a good and reasonably priced MongoDB Host, we recommend [mLab](https://mlab.com).
|
|
|
|
## Configuration
|
|
|
|
All settings are managed from the admin panel ([http://127.0.0.1:1111/admin](http://127.0.0.1:1111/admin)) except the Payment gateway and database settings.
|
|
|
|
##### Cart name and Cart description
|
|
|
|
These values are used for search engine optimization (SEO) purposes. They will be used as the title and description when your website is listed in Google and other search engines.
|
|
|
|
The `Cart name` is also used if there is no logo set.
|
|
|
|
##### Cart image/logo
|
|
|
|
Generally you would place your logo into the `/uploads` folder. You would then add the value `/uploads/mylogo.png` to the `Cart image/logo` setting value.
|
|
|
|
##### Cart URL
|
|
|
|
This value is vital for your cart to work. Set this value to your domain name/URL which customers will access your website. This value is used in returning from Paypal
|
|
payments and the sitemap for search engine indexing.
|
|
|
|
##### Cart Email
|
|
|
|
This email is used for any email receipts which are sent by your website.
|
|
|
|
##### Free shipping threshold
|
|
|
|
expressCart allows for the addition of a free shipping threshold. The cart will remove the shipping costs once the order has exceeded the `Free shipping threshold`
|
|
value. If the value of the cart is beneath the `Free shipping threshold`, the cart will add the `Flat shipping rate` to the total amount.
|
|
|
|
##### Payment Gateway
|
|
|
|
This determines which payment gateway to use. You will also need to configure your payment gateway configuration file here: `/config/<gateway_name>.json`
|
|
|
|
##### Currency symbol
|
|
|
|
Set this value to your chosen currency symbol. Eg: $, £, €.
|
|
|
|
##### Themes
|
|
|
|
Themes are a set of handlebars views and a stylesheet file. See `Cloth` theme as example.
|
|
|
|
Themes are loaded from `/public/themes/`.
|
|
|
|
It would be great to have some themes contributed back for others to use.
|
|
|
|
##### Number of Products per page
|
|
|
|
You can set the number of products per page by changing the `Products per page` value to a whole number of your choice. You may want to ensure
|
|
the number of products per page matches up with the `Products per row` value. Eg: if you have the `Products per row` value set to 3, you may want
|
|
to ensure the `Products per page` is a multiple of 3 for the best look.
|
|
|
|
##### Number of Products per row
|
|
|
|
This is the number of products displayed per row on your website. You can select anywhere up to 4 `Products per row`.
|
|
|
|
##### Menu enabled
|
|
|
|
Enables/disable the menu setup in `/admin/settings/menu`.
|
|
|
|
##### Menu header
|
|
|
|
This is the text which will be displayed at the top of your menu.
|
|
|
|
##### Menu position
|
|
|
|
You can set position where your menu will be displayed. Setting the value to `side` will position the menu to the left of your products, setting the value to `top`
|
|
will create a 'breadcrumb' menu at the top of the page
|
|
|
|
##### Paypal (Payments)
|
|
|
|
The Paypal config file is located: `/config/paypal.json`. A example Paypal settings file is provided:
|
|
|
|
```
|
|
{
|
|
"mode": "live", // sandbox or live
|
|
"client_id": "this_is_not_real",
|
|
"client_secret": "this_is_not_real",
|
|
"paypalCartDescription": "expressCart", // Shows as the Paypal description
|
|
"paypalCurrency": "USD" // The Paypal currency to charge in
|
|
}
|
|
```
|
|
Note: The `client_id` and `client_secret` is obtained from your Paypal account.
|
|
|
|
##### Stripe (Payments)
|
|
|
|
The Stripe config file is located: `/config/stripe.json`. A example Stripe settings file is provided:
|
|
|
|
```
|
|
{
|
|
"secretKey": "sk_test_this_is_not_real",
|
|
"publicKey": "pk_test_this_is_not_real",
|
|
"stripeCurrency": "usd", The Stripe currency to charge in
|
|
"stripeDescription": "expressCart payment", // Shows as the Stripe description
|
|
"stripeLogoURL": "http://localhost:1111/images/stripelogo.png" // URL to the logo to display on Stripe form
|
|
}
|
|
```
|
|
|
|
Note: The `secretKey` and `publicKey` is obtained from your Stripe account dashboard.
|
|
|
|
##### Authorize.net (Payments)
|
|
|
|
The Authorize.net config file is located: `/config/authorizenet.json`. A example Authorize.net settings file is provided:
|
|
|
|
```
|
|
{
|
|
"loginId": "loginId",
|
|
"transactionKey": "transactionKey",
|
|
"clientKey": "clientKey",
|
|
"mode": "test"
|
|
}
|
|
```
|
|
|
|
Note: The credentials are obtained from your Authorize.net account dashboard.
|
|
|
|
## Email settings
|
|
|
|
You will need to configure your SMTP details for expressCart to send email receipts to your customers.
|
|
|
|
You will need to consult your email provider for the relevant details.
|
|
|
|
##### Gmail settings
|
|
|
|
- `Email SMTP Host` = smtp.gmail.com
|
|
- `Email SMTP Port` = 465
|
|
- `Email SMTP secure` = True/Checked
|
|
- `Email SMTP Username` = example@gmail.com
|
|
- `Email SMTP Password` = yourpassword (you may need to setup an application specific password for this to work)
|
|
|
|
##### Zoho settings
|
|
|
|
- `Email SMTP Host` = smtp.zoho.com
|
|
- `Email SMTP Port` = 465
|
|
- `Email SMTP secure` = True/Checked
|
|
- `Email SMTP Username` = example@zoho.com
|
|
- `Email SMTP Password` = yourpassword
|
|
|
|
##### Outlook settings
|
|
|
|
- `Email SMTP Host` = smtp-mail.outlook.com
|
|
- `Email SMTP Port` = 587
|
|
- `Email SMTP secure` = False/Unchecked
|
|
- `Email SMTP Username` = example@outlook.com
|
|
- `Email SMTP Password` = yourpassword
|
|
|
|
You can use the `Send test email` button to ensure your email settings are correct.
|
|
|
|
## Menu
|
|
|
|
Although `expressCart` is a search based shopping cart, you can also group your products into categories using tags. You can then setup menu Items to "filter" based on
|
|
keywords (tags) to make it easier for your customers.
|
|
|
|
Setting of menu items is done via `/admin/settings/menu`.
|
|
|
|
To add a new menu item to filter products, you will set the menu text using the `Menu` field and setting the keyword to filter is using the `link` field.
|
|
|
|
To add a new menu item to link to a static page, you will set the menu text using the `Menu` field and set the static page URL using the `link` field. Eg:
|
|
An `About` page would be set. Menu = 'About Us', Link = 'about`
|
|
|
|
You can re-order menu items by clicking and dragging the arrows icon and placing the menu item in desired position.
|
|
|
|
## Static pages
|
|
|
|
You may want to create a static page to show contact details, about us, shipping information etc.
|
|
|
|
New static pages are setup via `/admin/settings/pages`.
|
|
|
|
## Contributing
|
|
|
|
I'm looking for contributors of any kind. I'm working on turning the admin panel into something more modern and using Vue.js. The frontend part of the website will always be a normal webapp with no SPA frameworks as I believe eCommerce apps should have SEO as top priority.
|
|
|
|
Contributing payment providers and themes would be much appreciated. Payment providers are added by simply adding the payment provider file to `/routes/payments/providerName.js`, then adding the route to the `app.js` file by adding `const providerName = require('./routes/payments/{providerName}');` and mounting the route `app.use('/providerName', providerName);`.
|
|
|
|
If you see current code which could be enhanced (note: parts of the code is quite old but new to Github) you are welcome to submit a PR.
|